To adjust slide out on an RV, start by locating the adjustment nuts on the actuator arms. Loosen the jam nuts and use the Nylock nut to either extend or retract the slide-out. If there’s a gap, adjust the Nylock nut outward to seal it properly. Make small, precise adjustments, then test the slide-out by extending and retracting it.
Want to get the full step-by-step guide? Keep reading below…
Check With Your Campground Before Adjusting Slide Out
Checking with your campground is important before adjusting your RV’s slideout. Slideouts provide extra living space inside your RV but also take up additional space in the parking area. Not all campgrounds allow RVs to occupy extra space.
It’s essential to contact campground management before extending your slideout. They may charge an additional fee or even prohibit using slideouts altogether. To avoid any troubles it’s always best to clarify the campground’s policies in advance.
Types Of Slide Out
Before adjusting a slide out on an RV, you must identify the specific type you need. Various kinds of slideouts vary from model to model. Each has different adjustment methods. Let’s take a look at these:
Electric Motor Driven Slides
Electric motor slide systems use an electric motor to drive a slide gear or cable, which then expands and retracts the slide. This is the most user-friendly and convenient type of slide. You can easily extend your slideout by pushing off a button on the RV slide switch.
Cable Slides
Cable slideouts consist of cables that pull the slide out and in. These are very lightweight but can support giant and heavy, deep slides. These slideouts are very reliable and efficient. You won’t see many corrosion issues, either.
Hydraulic Slide Out
The next type is hydraulic slideout. Hydraulic slideouts are usually used in larger RVs. Hydraulic slideouts use a hydraulic pump and fluid pressure to move the room in and out. They are powerful and effective but may require more maintenance.
Tip Out Slide Out
Tip-out slideouts are completely manual and present in older RVs. It is a challenging type of slideout. It has no automatic mechanism, so you must operate it with your physical effort.
There were several slide-outs, each with its own mechanism and maintenance needs. Now, let’s discuss the step-by-step slide adjustment.
Step By Step Instruction to Adjust Slide Out On An RV
If you’re experiencing issues with your slide-out not functioning properly—such as not extending fully or leaving a gap between the outer wall and the slide-out—this guide will help you make the necessary adjustments. Follow these steps to ensure your slide-out operates smoothly and efficiently.
Before making any adjustments, ensure the following:
Power Supply: Make sure your batteries are fully charged and connected to a reliable power source.
Hydraulic Fluid: Check that the hydraulic fluid reservoir is adequately filled.
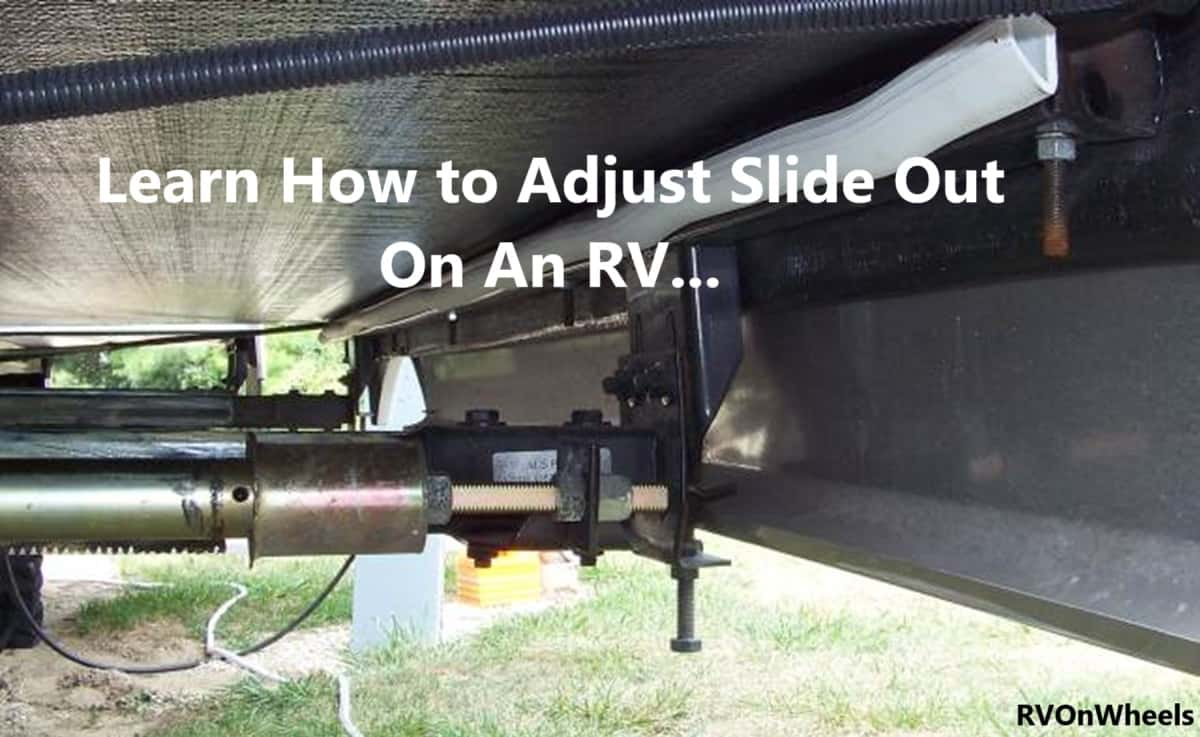
Identifying the Adjustment Nuts
1. Locate the Nuts:
- You’ll find two nuts on the actuator arms: Jam Nuts and Nylock Nuts.
- The Nylock nut is located at the end of the actuator arm and is the primary adjustment point for issues related to the slide-out not retracting properly.
2. Assess the Gaps:
- If there’s a large gap between the slide-out and the wall when retracted, adjust the Nylock nut.
- If the slide-out isn’t sealing flush against the wall when extended, adjust the two nuts on the actuator arm.
Making Adjustments
Step 1: Adjusting for Extension Issues
Tools Needed: Two wrenches.
Procedure: Follow the steps below to complete this procedure;
1. Loosen the jam nuts on the actuator arms using the two wrenches.
2. To extend the slide-out further (closing the gap inside), adjust the Nylock nut outward.
3. If the slide-out is too tight against the wall, move the nut inward.
4. Make these adjustments in small increments to avoid over-adjusting.
Step 2: Adjusting for Retraction Issues
Follow the 3 steps below to complete it.
1. If the slide-out does not fully retract, focus on the Nylock nut.
2. Adjust it outward to help the slide-out pull in tighter against the wall.
3. Recheck the gap and make additional minor adjustments as necessary.
Final Check
Once adjustments are complete, extend and retract the slide-out a few times to ensure it operates smoothly and seals properly against the wall. If issues persist, consider consulting a professional for further inspection.
By following these steps, you can effectively adjust your slide-out and enhance its functionality. Checkout this detailed video, if you are having difficulty in understanding the procedure by text. Enjoy your travels with peace of mind!
Regular Slide Out Maintenance Tips
You have to maintain your RV and slide outs regularly for a longer life. Let’s take a look at these tips:
- Lubricate Parts:To prevent rust and ensure smooth operation, periodically lubricate the nuts and actuator arms. We recommend using Boe Shield T9 for optimal protection.
- Clean Seals: Clean the seals around the slideout regularly. Remove dirt, debris and moisture. Use a mild soap and water solution to clean the seals, then wipe them dry with a soft cloth.
- Condition Seals: After cleaning the seals, apply a seal conditioner to maintain the flexibility of the rubber seals.
- Inspect Components: Check all slideout components regularly, including seals, gears, and the motor, for signs of wear or damage. If found, contact a professional as soon as possible to avoid costly repairs.
These maintenance tips will help enhance the performance and extend the lifespan of your RV slideouts.
If you haven’t named your RV yet, you might also like this detailed guide with 500 camper names.
Final Words
Hopefully, you now clearly understand how to adjust a slideout on an RV. Slideouts are the best feature that provides extra room in your RV. However, they require careful attention. After making adjustments, be sure to follow all the tips provided. Test your slideout to ensure it’s functioning correctly.
Although the information above should help you to do it yourself or slide out, we recommend consulting an expert for significant adjustments. Additionally, contact the campground administration staff before making any adjustments, as many campgrounds do not allow additional space for slideouts.
FAQs
How To Lubricate RV Slide Outs?
First, clean the slideout rails and gears from dust to lubricate your RV slideouts. Then, apply a silicone lubricant or a Dry Moly on it. Regular lubrication helps keep the slideout moving smoothly.
How Do I Reset My RV Slide Out?
First, turn off the RV’s power to reset your RV slideout and wait a few minutes. Then, turn the power back on and operate the slideout using the control switch. If the problem continues, contact a professional for further repair.
How To Remove RV Slide Out?
To remove an RV slideout, first extend it completely. Then, disconnect all connections and remove the bolts. Carefully slide the whole assembly out of the RV.
How To Replace RV Slide Out Floor?
To replace an RV slide-out floor, first, clear any obstacles. Next, unscrew the old floor and remove it from the slide-out frame. After this, install the new floor.
How To Insulate RV Slide Outs?
First, apply insulation foam or reflective tape to the slideout walls and floor to insulate RV slide outs. Use insulation panels or add weather stripping to the edges for better thermal protection. At the end, seal all gaps for more insulation.
How To Adjust RV Slide Out Vertical?
To adjust an RV slide-out vertically, use a wrench to modify the adjustment bolts on the slide-out’s motor or gearbox.